Showing posts with label diy. Show all posts

Thursday, August 22, 2013

DIY: Ombré stairs!

Ok my friends... It's been a long time coming- but I'm ready to share.  
Behold! The first DIY post from our crazy home remodel project...  Emphasis on the crazy.


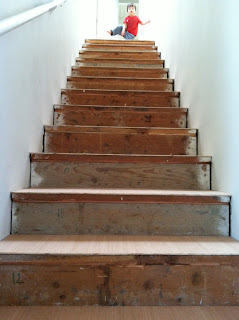
Here's Elliott modeling the wreck we were left with after ripping out that nasty carpet. 
My dad was kind enough to drive up from San Diego and lend a little experience and expertise to our otherwise fly by the seat of our pants/make it up as we go - construction philosophy.
It was his idea to trim the overhang (a painstaking job) and add a rounded, finished trim piece to the edge.  When I questioned the extra work and additional cost he said: "Uhhh... I'd have a hard time putting my name on it with that big gap you've got on there now."  Touché, dad...  Touché.
I'll spare you the sweaty guys sawing and bending over bit and move straight on to the pretty part.  :)


Ok, so this is where I took over the job.  I had really been wanting to try an ombré staircase, and decided to tackle it yesterday while Elliott napped.  HA!  Wishful thinking on my part.  This project was about 10,000x more intense than I expected.  Plus you can always count on me to be impatient and ill-prepared, but... ONWARD HOOOO!!!

After debating my color options right down to the moment I put brush to board, I decided on a pinkish/coral gradient.  I went from dark at the bottom to light at the top to give it an enhanced ascending effect.  The skylight at the top of the stairs was kind of the cherry on the cake for this effect- providing a great, bright white quality as your eyes go up.  Hey, did you know that each and every stair in our house is a unique and special snowflake with totally irregular dimensions, bumps, and divets?  Yeah, we didn't either.  Jeff and my dad measured each one individually, cut them, ground them, filed them, and cut a corresponding face board, marked with a number (my idea) to make things easier when matching them up.
   
After a lot of mixing trial and error, I went the Dixie cup route.  13 faces, 13 Dixie cups.  Beginning with a deep, vibrant coral red which fades to a barely-there shade of pink at the very top step.  I used our white house paint as a base in each cup and added a true red in varying amounts.  I laid the boards flat, and went about painting them in sequence.  The first result was a little too clean and looked more like a color-block than the subtle ombré fade that I was going for.
  
It took me a good hour and a half (and Elliott waking up and walking over the wet boards twice), to figure out that I needed to ignore the individual boards and treat them as one big canvas.  
Painting over the gaps and letting each one mix and fade a bit into the next really made all the difference.  I got the exact vision I had for these stairs in my head.  If you try it, keep a cup of water handy for dipping and blending.  

The end result.  I'm in love.  James thinks it looks like a sunset, and I think that's a huge compliment.  

Aaaand this is what it's all about... The before and after!  


WOO HOO! *cheerleader jump*


Friday, April 26, 2013

The best facial mask I've ever used...

Cheap + effective.  
Let me preface this post with an admission... As it concerns my skin, I'm a bit of a product snob.  I like fancy facials, exotic serums, and expensive creams. I justify this because skin is the biggest organ on the body, and also the largest eliminatory organ.  When clear and functioning properly, it flushes out toxins.  It makes sense to take good care of it, right?  Granted, taking good care of it isn't all about products... it's a healthy diet, plenty of clean water, and staying active;  And even then- there are good days and bad...  It's no wonder with makeup, dirt, and all the gunk we pick up throughout the day.  Sometimes you just have to detox your face, and start fresh.  I've tried a ton of masks (mud, clay, cream, enzyme, lactic, mineral, lemon, pumpkin, papaya, yogurt, honey) from dozens of brands, and many great spas.  Most of them extremely pricey.  But honestly, I have never experienced such a dramatic (and immediate) result as with this one...  It's cheap, lasts forever, and most importantly... it WORKS.  AZTEC SECRET CLAY MASK is what my mother used when I was a kid, and I've used it off and on since I was a teenager.  

Jeff threatened to take a picture of me in the mask, and I was like "NOOO!"  But then I thought... hmm, maybe there should be an embarrassing photo to accompany this post.  So here ya go:

Here I am, looking like a deer caught in headlights because I am totally unable to move my face.  Though not pretty, this photo is good for illustrating the importance of avoiding your eye area.  Definitely don't want it there- way too harsh for that super delicate tissue.  

THE PROCESS: Mix a heaping teaspoon of the clay powder with apple cider vinegar (use ceramic, wood, or plastic to mix- no metal), apply it thick and goopy, kick back and read a magazine.  This isn't one of those is it or isn't it working kind of things.  Your face will actually PULSATE as it dries and sucks all the impurities out of your pores.  This is a vigorous mask- not for extremely sensitive skin types.  Mixing it with water is an alternative for those who prefer a gentler mask.  This drying process takes 20-30 minutes.

THE RESULTS: After the mask is dry (and you are unable to move your face), rinse with warm water.  Make sure you soften it with the water before trying to slough it off.  No need to use soap.  Gently pat it dry, and apply your favorite moisturizer.  Your face will be red from all of the blood rushing to it.  This is fine, it's just circulation doing its job.  I prefer to do this mask before going to bed- so the redness won't matter.  It goes away in 20 minutes or so.  Your skin will feel buttery soft, and absolutely CLEAN.  It's incredible.  The following morning you'll be radiant, fresh, and glowy.  Repeat once a week or so.  

BUY IT: The mask is usually around $6 for a big tub that will last forevvvvvvs.  I've never actually finished a jar, because I always end up passing it on to friends.  And the apple cider vinegar is $3.50 or so.  You can find these at your local health food store, or good ole' Amazon.

Enjoy your gorgeous skin!  Thanks, mom.  ;)


Tuesday, January 22, 2013

Tassel love...

Did you know that $6 can transform your favorite old purse into the must-have bag for Spring?
TA DA!!!

TASSELS!  Who knew?!  Wanna see how I'm using them? As evident by my horse in tassels, a better question would be how am I NOT using them...  
Be-tasseled Starbuck!

Be-tasseled keys!

Be-tasseled bag #1.

 Nails to match my tassels!

Be-tasseled bag #2.

Requisite matching nails (see bag #2).

How will YOU be-tassel this Spring?

xoxo,

Natural Life tassels, Butter London Polish, and Cut n Paste bags- available at AMBIANCE


Thursday, October 18, 2012

COMME des GARÇONS manicure amazingness...

Oh my gosh... I think I've just found my all-time favorite manicure tutorial, c/o thebeautydepartment.com
This is like the cherry on top of a Rei Kawakubo sundae dream surprise.
Or maybe the icing on a COMME des GARÇONS cupcake.
Or the sparkle on a glitter on the dewdrop on a unicorn eyelash.

Yes, I'm excited.  ♥


Thursday, August 9, 2012

Before + After DIY chair makeover...

Hello friends...  See that chair up there?  
Here's the backstory; I've been parking my butt on it for nearly 3 decades.  
My mom found it at a teacher's estate sale a long, long time ago along with a matching desk.  The desk/chair set lived in my room as a kid, and it's where I did homework, listened to Joni Mitchell for the first time, wrote and edited a zine, cried into my journal, and ate meals with my head buried in a book during my parent's fancy dinner parties.  
Quick!  Look away for a sec, mom...  
I also secretly carved my name into both pieces.  

Somewhere along the line the desk went rogue, but thankfully my mother had the foresight to load this chair into a Matson container and haul it over the ocean with her when she moved to California.  I still use this chair just about every day.  I love it.   

Needless to say, the chair deserved a little facelift.  The white paint had some pretty well-worn indigo stains from years of my denim-clad posterior sitting in it.  SO...

Step 1: A fresh coat of ivory paint (but only on top, b/c those distressed legs are where it's at).
Step 2: Squiggly branches with dark brown paint.
Step 3: Emerald green + golden brown leaves - 1 quick stroke w/ sideways brush that ends in a point.
Step 4: Messy pink abstract flowers - stamping motion in center w/ swirly edges.
Step 5: Stamp red paint just in center of flowers.  Use dry brush.

Now I love my favorite chair even more!  ♥


Friday, July 20, 2012

Romantic Crown Braid... tutorial!

The lovely Leah was kind enough to collaborate with me on a GREAT hair tutorial earlier this week!  I'm really excited about this because it went so well, that we're already talking about the next one!  Personally, I can barely manage a decent ponytail- but Leah made this look like a breeze!  She and her friend Andi did such a beautiful job.  I really hope you enjoy!  ♥
*note - Ok, apparently I don't know how to count, since I have more steps than Leah. Aaand I guess I don't like the #8?!  Whaaat? It still works.


Leah's step-by-step guide:

You'll Need - A comb, bobby pins, 2 clear elastic bands, styling product (like a pomade or paste) + hairspray!


1. Comb hair  and part on side. You choose how deep you want the side part to go.

2. Create a diagonal part using a comb, ending the part just below the ear on the opposite side.

3. Begin an inverse braid. This is an upside down french braid. Taking the hair under instead of over allows the braid to "stand up". If this is too difficult, do a traditional french braid in it's place.

4. Taking hair only from the crown to incorporate into the braid continue the braid all the way down.

5. Secure with a clear elastic band.

6. Do the same thing on the opposite side.

7. Once braids are finished and secure, gently tug them apart, creating separation and a larger, more imperfect braid. You can be subtle about this or you can go big and really pull the braid apart.

8. Pull the braid around the back of the head just above the nape and secure with bobby pins just above the ear.

9 . Take braid from the opposite side and cross over the first braid, securing with bobby pins as you go. Remember to tuck in the loose ends of the tail of the braid!

10. Spray with hairspray.

YOU'RE DONE!  :)


Leah's bracelets/Andi's necklaces: Heather Gardner 
Denim Jacket: FREE PEOPLE 
Andi's floral top: FREE PEOPLE 
Leah's nail polish: Butter London "Trout Pout"
{all of the above available at AMBIANCE}


Monday, July 16, 2012

Super excited about...

I had such a great time today meeting Leah of Paradiso Per Due, and collaborating with her on an awesome hair tutorial!  Here's a sneak peek of Leah in action...  Isn't she the cutest?
She's also a ridiculously (fighting the urge to say ridonculously- losing the battle) good baker, and brought Caramel Sea Salt cookies + LAVENDER CHOCOLATE CUPCAKES to the shoot.  She's kinda my hero for that.  
Stay tuned for all things hair/braid/crown related later this week.  Thanks again, Leah!  
And a BIG thank you to Andi too, for letting me snap so many pictures in her face while Leah made her hair pretty.  ♥ 


Wednesday, June 27, 2012

Catching dreams...

I've never really been into dream catchers...  but these DIY doily dream catchers are (sayitwithme) uhmayzeeeeeng.  These are not your 12-year-old-visits-the-Grand-Canyon-souvenir dream catchers...  These are beautiful, and grown up, and lady like.  
And I love them. 

Don't you think these would give you the most blissfully pretty dreams?  They'd be great in a child's room too.  What a fun Summer project!  If this is something you'd like to tackle, the always lovely Lune Vintage does a fabulous tutorial here.


{photos via Lune Vintage}

Tuesday, May 22, 2012

Home Inspiration...


I'm loving the pretty, graphic paper peeking out from behind the shelves in this photo.
What a neat way to draw the eye back, behind the items.  It seems like it could easily look like 
a jumbled mess of clutter, and too busy... but with all of the white - and the great pops of pink
and blue, I think they pulled it off beautifully.


Here's how I used busy patterns in my own teeny kitchen.  

The pretty, statement-making wallpaper is actually just GIFT WRAP from Paper Sky!
It went on super quickly and easily with a small paint brush, and a little Mod-Podge. 
The best part?  When a project is this simple, and inexpensive- you can swap it out as often as you please.

Perfect medicine for those impulsive moments when my redecorate-disease is acting up and the only cure is to move a couch, paint a wall, or break out the Feng Shui books.


Sunday, April 15, 2012

Let's make... SPROUTS!

How do you feel about sprouts?


I looooove sprouts.  LOVE them.  Is that weird?  They're teeny, yummy, and fun to eat!  As a kid, I'd snack on them by the handful.  I secretly still do.  And you know what... Jeff and Evy aren't big veggie or salad eaters, but they will inexplicably gobble up sprouts in sandwiches, and quesadillas.  Even Elliott's starting to eat them!  It makes me happy to have them around and know that my picky eaters will get a tasty, nutrient-packed punch.  Different varieties offer different benefits, but many are full of heart healthy compounds, anti-cancer isoflavones and sulforaphane, as well as protein, vitamins A, C, and D, calcium, and folate.  Current studies even suggest that sprouts may prevent and reduce menopausal symptoms.  All this goodness contained in those cute little greenies?  Amazing!

While pregnant with Elliott I craaaaved sprouts.  I harassed the guy at the Mt. Olive stand at Farmers Market every Thursday, and wiped out his sprout stock frequently.  That is, until I started growing my own!  It's so easy, WAY cheaper, and surprisingly fun too!

Here's my home-grown sprout DIY:


I like to start with a mix of Alfalfa, Mustard, Mung, radish and Broccoli seeds.  Radish, mustard and broccoli sprouts seem to offer a mild peppery flavor.  Not spicy, just more flavorful, really.  I can feed this mixture to the baby.  I buy my seeds in the bulk section at SLO Natural Foods Co-op.  Did you know that you need not be a member?  It's a great spot for picking up healthy basics downtown.  


Next, you'll need a jar.  Most health food stores carry sprouting jars.  If you don't see them, ask.  You can grow sprouts in any large, glass jar with cheesecloth and a rubber band.  My jar has a wonderful wire mesh lid and I paid around $6.  Excellent deal and very easy to use.  


Add a spoonful of seeds to your jar.  


Now, rinse them a bit, fill your jar 1/3 with fresh water, and leave your seeds overnight.


You'll notice the seeds beginning to expand and soften underwater.  

Homework:  The following morning, you'll want to completely drain the water from your jar and rinse the seeds several times.  I rinse them twice in the morning, once in the afternoon, and one more time before I go to bed.  The seeds should be kept in a shady (but not dark) spot in the kitchen, and kept moist, but never sit in water after the first night.  After 2-3 days of rinsing, your seeds will be quite sprouted and ready for a few hours of indirect sunlight to soak up healthy chlorophyll and turn a darker shade of green.  

And then... 


VOILA!  Your very own yummy, home-grown sprouts!  I keep mine in a covered Tupperware container in the fridge, with a paper towel to soak up any remaining water.  They'll last nearly a week, unless gobbled up. ♥


UPDATE:
My mother has asked that I stress the importance of the RINSING in growing sprouts.  To quote her: "If not properly rinsed and stored sprouts can become a bacterial garden in a jar."  Very true, mom.  Good advice.  This project is all about the RINSE, RINSE, RINSE.  And then rinse one more time.  ;)