

Ok my friends... It's been a long time coming- but I'm ready to share.
Behold! The first DIY post from our crazy home remodel project... Emphasis on the crazy.

Here's Elliott modeling the wreck we were left with after ripping out that nasty carpet.
My dad was kind enough to drive up from San Diego and lend a little experience and expertise to our otherwise fly by the seat of our pants/make it up as we go - construction philosophy.
It was his idea to trim the overhang (a painstaking job) and add a rounded, finished trim piece to the edge. When I questioned the extra work and additional cost he said: "Uhhh... I'd have a hard time putting my name on it with that big gap you've got on there now." Touché, dad... Touché.
I'll spare you the sweaty guys sawing and bending over bit and move straight on to the pretty part. :)


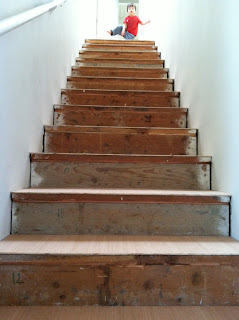
Ok, so this is where I took over the job. I had really been wanting to try an ombré staircase, and decided to tackle it yesterday while Elliott napped. HA! Wishful thinking on my part. This project was about 10,000x more intense than I expected. Plus you can always count on me to be impatient and ill-prepared, but... ONWARD HOOOO!!!
After debating my color options right down to the moment I put brush to board, I decided on a pinkish/coral gradient. I went from dark at the bottom to light at the top to give it an enhanced ascending effect. The skylight at the top of the stairs was kind of the cherry on the cake for this effect- providing a great, bright white quality as your eyes go up. Hey, did you know that each and every stair in our house is a unique and special snowflake with totally irregular dimensions, bumps, and divets? Yeah, we didn't either. Jeff and my dad measured each one individually, cut them, ground them, filed them, and cut a corresponding face board, marked with a number (my idea) to make things easier when matching them up.

After a lot of mixing trial and error, I went the Dixie cup route. 13 faces, 13 Dixie cups. Beginning with a deep, vibrant coral red which fades to a barely-there shade of pink at the very top step. I used our white house paint as a base in each cup and added a true red in varying amounts. I laid the boards flat, and went about painting them in sequence. The first result was a little too clean and looked more like a color-block than the subtle ombré fade that I was going for.

It took me a good hour and a half (and Elliott waking up and walking over the wet boards twice), to figure out that I needed to ignore the individual boards and treat them as one big canvas.
Painting over the gaps and letting each one mix and fade a bit into the next really made all the difference. I got the exact vision I had for these stairs in my head. If you try it, keep a cup of water handy for dipping and blending.

The end result. I'm in love. James thinks it looks like a sunset, and I think that's a huge compliment.
Aaaand this is what it's all about... The before and after!
WOO HOO! *cheerleader jump*

Okay I've already basically said this to you on IG but man- you're my hero!! these stairs are gorgeous!! good job my friend!!!
ReplyDeletei'm absolutely in love with this. you nailed it!
ReplyDeletewhat a fun way to spice up the house!
i'm sure its not as easy as you made it look but i might need to try~
xo The Egg