Showing posts with label before and after. Show all posts

Thursday, August 22, 2013

DIY: Ombré stairs!

Ok my friends... It's been a long time coming- but I'm ready to share.  
Behold! The first DIY post from our crazy home remodel project...  Emphasis on the crazy.


Here's Elliott modeling the wreck we were left with after ripping out that nasty carpet
My dad was kind enough to drive up from San Diego and lend a little experience and expertise to our otherwise fly by the seat of our pants/make it up as we go - construction philosophy.
It was his idea to trim the overhang (a painstaking job) and add a rounded, finished trim piece to the edge.  When I questioned the extra work and additional cost he said: "Uhhh... I'd have a hard time putting my name on it with that big gap you've got on there now."  Touché, dad...  Touché.
I'll spare you the sweaty guys sawing and bending over bit and move straight on to the pretty part.  :)


Ok, so this is where I took over the job.  I had really been wanting to try an ombré staircase, and decided to tackle it yesterday while Elliott napped.  HA!  Wishful thinking on my part.  This project was about 10,000x more intense than I expected.  Plus you can always count on me to be impatient and ill-prepared, but... ONWARD HOOOO!!!

After debating my color options right down to the moment I put brush to board, I decided on a pinkish/coral gradient.  I went from dark at the bottom to light at the top to give it an enhanced ascending effect.  The skylight at the top of the stairs was kind of the cherry on the cake for this effect- providing a great, bright white quality as your eyes go up.  Hey, did you know that each and every stair in our house is a unique and special snowflake with totally irregular dimensions, bumps, and divets?  Yeah, we didn't either.  Jeff and my dad measured each one individually, cut them, ground them, filed them, and cut a corresponding face board, marked with a number (my idea) to make things easier when matching them up.
   
After a lot of mixing trial and error, I went the Dixie cup route.  13 faces, 13 Dixie cups.  Beginning with a deep, vibrant coral red which fades to a barely-there shade of pink at the very top step.  I used our white house paint as a base in each cup and added a true red in varying amounts.  I laid the boards flat, and went about painting them in sequence.  The first result was a little too clean and looked more like a color-block than the subtle ombré fade that I was going for.
  
It took me a good hour and a half (and Elliott waking up and walking over the wet boards twice), to figure out that I needed to ignore the individual boards and treat them as one big canvas.  
Painting over the gaps and letting each one mix and fade a bit into the next really made all the difference.  I got the exact vision I had for these stairs in my head.  If you try it, keep a cup of water handy for dipping and blending.  

The end result.  I'm in love.  James thinks it looks like a sunset, and I think that's a huge compliment.  

Aaaand this is what it's all about... The before and after!  


WOO HOO! *cheerleader jump*


Tuesday, June 5, 2012

Before + After, iPhone edit...

I'm a little bit obsessed with this amazing before + after photo that Jeff did yesterday.

BEFORE

+

 AFTER

Isn't this incredible?  I sat there watching him edit this on his phone for less than 5 minutes, 
and the results are jaw-dropping.  Good job, Sahnzy.


Tuesday, December 20, 2011

3 adults + 2 days + $510 = major room make-over...

mkovr_top

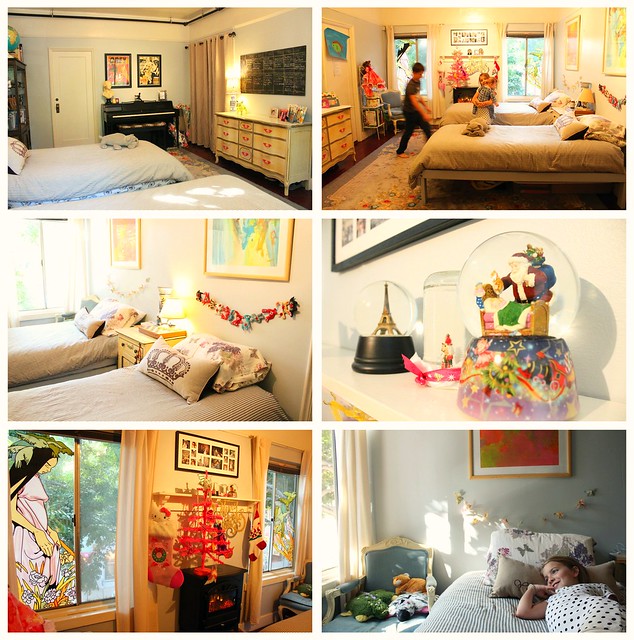
Sooo... with the kids getting older now, I thought I'd give them something a little more substantial for Christmas this year. Rather than go the usual toys/clothes route, only to see the new clothes shoved in the back of a drawer in favor of the old favorites- or new toys played with for a few weeks and promptly forgotten (or worse, broken), I wanted to give them something special and lasting; that could be appreciated for the long-term. I gave myself a $500 budget, which I'm very proud to say went only $10 over in the end. I enlisted the help of my dad, which was indispensable, and poor Jeffrey stayed up until 4:00 am varnishing on his hands and knees Saturday night, but WE DID IT! In one weekend, we managed to completely overhaul the room and it turned out even better than I'd imagined.

mkovr_1
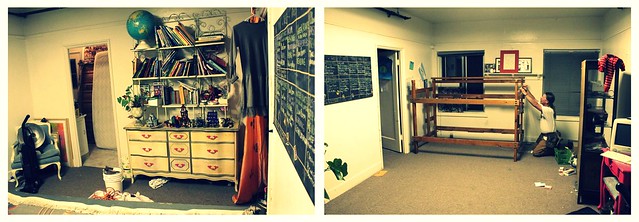
The dreaded BEFORE pictures... Of course I thought to take these after we'd begun to disassemble the beds and move things out. But you'll definitely sense the impact of the change. Note the sad, white walls and the HORRENDOUS commercial carpet.

During...

mkovr_2

And AFTER!

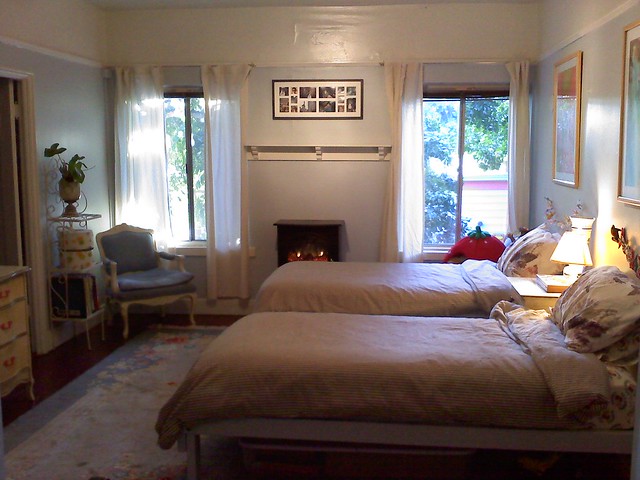
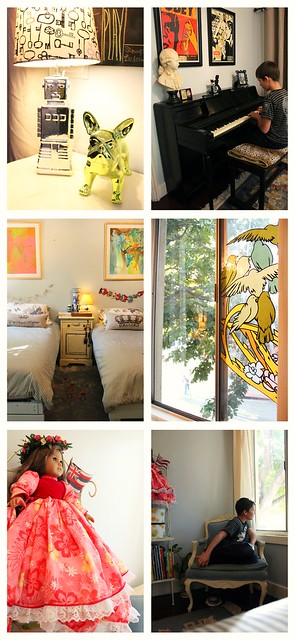
Because space is always of the utmost importance in any shared room, and bunk beds are typically used as a space-saving sleep system- I thought long and hard about transitioning them into twin beds. I sketched, measured, met with oppposition, and finally took a leap of faith. Guess what... It was so worth it! The twin beds opened the room vertically, unblocked a window- letting natural light flood in, and made the room feel so fresh and mature. Our initial plan was to make a trek to Ikea, but I'm so glad we didn't! Not buying everything new was a huge asset to the space. It's incredibly cozy, soft, and serene, with a comfy, lived-in quality; like a great little B&B. Evelyn says it makes her feel like her room is its own house inside our home.
mkovr_horiz

They came home on Sunday, walked into a brand new room, and were totally thrilled. So sweet, and excited, and truly grateful.

mkovr_vert
I have to say- though we did this for the children, the project has really affected the whole family. We actually find ourselves hanging out in their room with them. Not typical for us. This is by far the best Christmas present we ever could have given them. The kids are genuinely enjoying the time they spend in there, taking pride in it (i.e. keeping it CLEAN *gasp*), and while we were out yesterday Evy said "I can't wait to get back home to be in my room" - that in itself is pretty heartwarming. James even blogged about it.

Amazing.  :)


I cut a few corners by:

1. Leaving the trim "as is", both above and below the new paint-job.
2. Purchasing a big California King sized duvet from Ruby Rose, and sewing it into two twin-sized duvets. I fell in love with the classic ticking, and the oh-so-soft-washed-ten-bazillion-times feel of it. :)
3. Cutting a sturdy, old, wooden bunk-bed into two twin beds. THANK YOU, DAD!!!
4. Sewing an amazing pair of 1940's curtains (that I've hung on to for 10 years) into pillow shams.
5. Using hand-me-down inherited antiques, Louis XVI chairs, and gigantic rug from Jeff's grandma.
6. Dresser was a thrift-store find. Handles are painted with Montana 94 paint in "Magenta".
7. Window cut-outs are our old Sam Flores shower curtain, re-purposed.
8. Set of 4 vintage curtains from Ruby Rose.

I splurged on:

1. An awesome faux-fireplace heater, on stone base hearth. This thing is totally mesmerizing and really took the whole project over-the-top in terms of awe-factor with the kids. Also, it heats the room SO well, and has both high and low wattage settings to save energy. I want one in our room!
2. A new ceiling light fixture. The old fluorescent lighting was just awful. Cold, clinical, unflattering, and so depressing. We replaced it with a really pretty bronzed metal track with amber colored glass shades. It casts a warm, glowing light throughout the room and really elevated the project.
3. New throw pillows for each bed.

*Paint is Behr's "French Grey Blue" in eggshell. I'm definitely buying more of it and using it wherever I can. It's incredible. It feels very clean and contemporary, but also like it's been there forever. Calming, soothing, beautiful and somehow both warm and cool at once... a dream color.