Showing posts with label easy. Show all posts

Wednesday, December 19, 2012

Easy peasy sushi yummy...


In this- the Season of get-togethers, parties, and communal meals... I thought I'd share one of my favorite appetizer recipes.  This is a quick-ish, basic (non-raw) sushi, that's easy to make, and fun to share.  Jeff thought they looked fancy, but when I was a kid- this was the sushi you took to school for class parties, or had at pot-lucks, church events, and BBQ's.  It was always around, always a kid-favorite, and fun- but definitely not fancy.  Basically it's the potato salad of sushi.

You'll need: Bamboo rolling mat, short-grain sushi rice, package of nori, 2 cans of tuna, 1 carrot, 1 egg, sugar, salt, rice vinegar, (optional:) colored shrimp powder, sesame seeds.

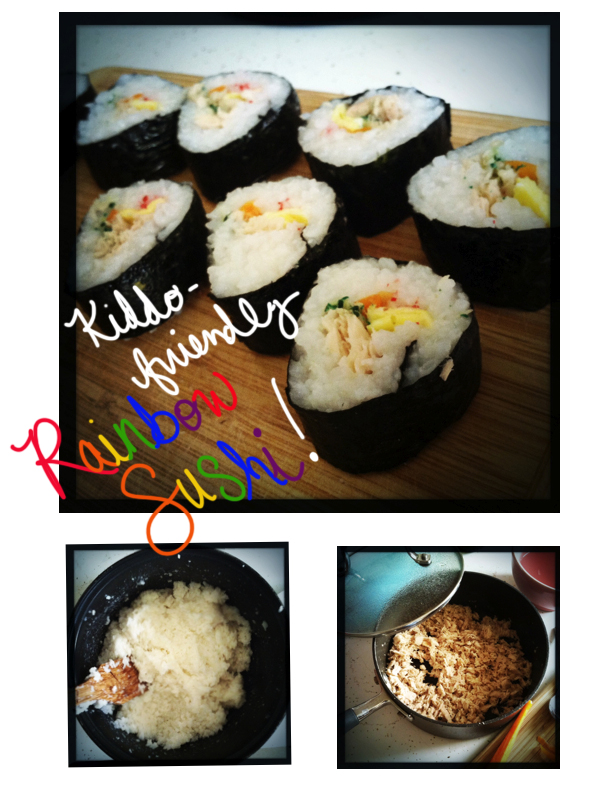
1. Make a good batch of sushi rice (please don't replace this with another type of rice- it ruins the sushi).  
Need a good recipe for perfect sushi rice?  I like this one (scroll down on the page).

2. Shave your carrot with a vegetable peeler.  The longer the peels, the better.

3. Scramble your egg and pour it into a hot non-stick pan- the goal is a very thin, crepe-like end result.  It only takes about 20-30 seconds, so watch carefully.  Remove from heat, let cool, and slice in strips.

4. Drain and empty your tuna into a bowl, add about 2 TBS. sugar, and 2 TBS. rice vinegar. Mix well.  Set aside.

5. Place your nori rough side up on the bamboo mat, add rice evenly to the bottom 2/3 of the nori, place one strip of egg, one length of carrot, a generous line of tuna, and a teeny line of shrimp powder all the way down the center- horizontally.  

6. Roll carefully, quickly, and firmly (but not too hard).  It may take a few tries- but you'll get it.  Then simply

SLICE + SERVE!  

 If you have sesame seeds, add a tiny pinch to the top of each slice, right in the center.  I like to wrap extra rolls, unsliced, in wax paper and slice those as needed just before they're served.  This is a great party appetizer, or snack, but they're best eaten fresh and at room temperature.  ENJOY!  


*UPDATE: I forgot to mention this, but it's important... keep a bowl of water nearby to dip your fingers in before and after handling the rice.  It's soooo sticky- the rice will help keep things neat and tidy.  But make sure the water doesn't drip on your nori- things will go downhill fast.  Also, at the very end of the rolling process, use your finger to lightly pat a little water just on the very end.  It acts as a seal to keep your sushi roll tightly closed.  :)


Saturday, August 25, 2012

Easy peasy, super pretty FISHTAIL BRAID...

It's hair tutorial time again!  Leah + I have a great new one for you...  
A gorgeous FISHTAIL braid!  


I love love love this pretty hairstyle, and I love even more that it's the kind of thing you can do yourself at home.  I'm excited to try this on Evelyn.  It's a really fun alternative to a basic braid.  It looks really complicated and intricate- but this took Leah less than 5 minutes.  Really!  And look at how it brings out the highlights in Kannyn's hair.  SO cool.  


Leah's step-by-step, easy peasy instructions:

1. Brush hair into pony tail, this may be a low side pony or in the back.  * a side note: I'd like to point out that when doing this on oneself, it will be easier to do a side pony version, but by no means is it impossible to do it in the back.

2. Secure with clear elastic band and start by splitting the hair into two sections. 

3. Beginning on one side pull a small section of hair from underneath. Pull this section around and across to the opposite side. 

4. Repeat this process going down the divided pony tail until you reach the desired amount of hair braided.

5. Secure with the second clear elastic.

6. Gently tug on the braid if you would like a wider fishtail. 

7. Optional- If you desire a looser braid, cut the top clear elastic. 

Spray and TA-DA, you're done!!  :)

Kannyn's tunic - Free People, Trapeze Top
Leah's nail laquer - Butter London, Queen Vic
{Both available now at AMBIANCE}

Tuesday, June 12, 2012

hot dog!

This may not be the fashionable thing to say, but...  I love a good hot dog.

I don't actually eat meat very often, but once every couple of months I have a ridiculous hot dog craving, and so... once every couple of months- we'll have a ridiculous hot dog dinner.  It's easy for a hot dog dinner to be sufficiently gross- so I've learned to follow a few basic rules before presenting this ballpark favorite to my family...

1. Most importantly, buy really great hot dogs.  
If you had to pick just one thing to be insanely picky about in life- it should be this.

2. Make them special.  
As in, fancy little baguettes instead of buns, a variety of mustards, pretty plates and fabric napkins, etc.

3. Serve them with something really fresh.  
I like a simple arugula salad with most every meal, but a nice tabouli, or quinoa salad would be great too.


And I ask you... What says "SUMMER" better than a tasty hot dog on the back porch at the end of the day?   :)


Tuesday, May 22, 2012

Home Inspiration...


I'm loving the pretty, graphic paper peeking out from behind the shelves in this photo.
What a neat way to draw the eye back, behind the items.  It seems like it could easily look like 
a jumbled mess of clutter, and too busy... but with all of the white - and the great pops of pink
and blue, I think they pulled it off beautifully.


Here's how I used busy patterns in my own teeny kitchen.  

The pretty, statement-making wallpaper is actually just GIFT WRAP from Paper Sky!
It went on super quickly and easily with a small paint brush, and a little Mod-Podge. 
The best part?  When a project is this simple, and inexpensive- you can swap it out as often as you please.

Perfect medicine for those impulsive moments when my redecorate-disease is acting up and the only cure is to move a couch, paint a wall, or break out the Feng Shui books.